

Permiteți-mi să vă arăt rapid cum să conectați serverul Windows de la Ansible care rulează pe Ubuntu.
Pentru a urma pașii de mai jos, trebuie să aveți instalate Python 3.x și Ansible pe ambele sisteme. Puteți urmări articolele de mai jos dacă aveți nevoie de ajutor.
Cum se instalează și se configurează Ansible pe Ubuntu?
Cum se instalează Ansible pe Windows?
Mai jos sunt detaliile ambelor servere pe care le folosesc:
- Controller Ansible – 192.168.0.108
- Windows Server – 192.168.0.102
Cuprins
Pasul 1: Creați utilizator Ansible Windows
Creați un utilizator nou pentru configurarea conexiunii Ansible Windows.
- Deschideți Computer Management pe sistemul dvs. Windows și accesați Local Users and Groups.
- Faceți clic dreapta pe Utilizatori și creați un utilizator nou.
- Selectați caseta de selectare Parola nu expiră niciodată și faceți clic pe creați.
- Acum, printre grupurile disponibile, faceți clic dreapta pe grupul Administratori și faceți clic pe proprietăți.
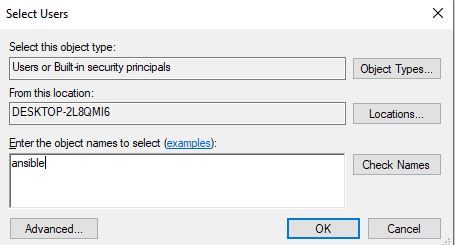
- Faceți clic pe Adăugare și introduceți ansible în numele obiectelor.
- Faceți clic pe opțiunea de verificare a numelor și apoi pe Ok.
Acum, un utilizator ansible pe o mașină Windows este gata.
Pasul 2: Configurați bibliotecile și WinRM
Accesați computerul controler ansible, actualizați-l și instalați bibliotecile menționate mai jos.
[email protected]:~$ sudo apt-get update
[email protected]:~$ sudo apt-get install gcc python-dev
[email protected]:~$ sudo apt install python3-pip
WinRM înseamnă Windows remote management. Vă permite să efectuați sarcini de gestionare pe sisteme Windows la distanță. Vom instala python3-winrm, un client python care este folosit pentru a face o conexiune la sistemul Windows.
[email protected]:~$ sudo apt-get install python3-winrm
Reading package lists... Done
Building dependency tree
Reading state information... Done
The following packages were automatically installed and are no longer required:
gyp libc-ares2 libhttp-parser2.8 libjs-async libjs-inherits libjs-is-typedarray libjs-node-uuid libuv1 libuv1-dev node-abbrev node-ajv
node-ansi node-ansi-color-table node-ansi-regex node-ansi-styles node-ansistyles node-aproba node-archy node-are-we-there-yet node-async

node-validate-npm-package-license node-wcwidth.js node-which node-which-module node-wide-align node-wrap-ansi node-wrappy node-y18n
node-yallist node-yargs node-yargs-parser nodejs nodejs-doc
Use 'sudo apt autoremove' to remove them.
The following additional packages will be installed:
python3-kerberos python3-ntlm-auth python3-requests-kerberos python3-requests-ntlm python3-xmltodict
The following NEW packages will be installed:
python3-kerberos python3-ntlm-auth python3-requests-kerberos python3-requests-ntlm python3-winrm python3-xmltodict
0 upgraded, 6 newly installed, 0 to remove and 231 not upgraded.
Need to get 84.8 kB of archives.
After this operation, 442 kB of additional disk space will be used.
Do you want to continue? [Y/n] Y
Get:1 http://old-releases.ubuntu.com/ubuntu cosmic/universe amd64 python3-kerberos amd64 1.1.14-1build1 [16.8 kB]
Get:2 http://old-releases.ubuntu.com/ubuntu cosmic/universe amd64 python3-ntlm-auth all 1.1.0-1 [19.6 kB]
Get:3 http://old-releases.ubuntu.com/ubuntu cosmic/universe amd64 python3-requests-kerberos all 0.11.0-2 [10.1 kB]
Get:4 http://old-releases.ubuntu.com/ubuntu cosmic/universe amd64 python3-requests-ntlm all 1.1.0-1 [6,004 B]
Get:5 http://old-releases.ubuntu.com/ubuntu cosmic/universe amd64 python3-xmltodict all 0.11.0-2 [10.6 kB]
Get:6 http://old-releases.ubuntu.com/ubuntu cosmic/universe amd64 python3-winrm all 0.3.0-2 [21.7 kB]
Fetched 84.8 kB in 1s (70.3 kB/s)
Selecting previously unselected package python3-kerberos.
(Reading database ... 244430 files and directories currently installed.)
Preparing to unpack .../0-python3-kerberos_1.1.14-1build1_amd64.deb ...
Unpacking python3-kerberos (1.1.14-1build1) ...
Selecting previously unselected package python3-ntlm-auth.
Selecting previously unselected package python3-xmltodict.
Preparing to unpack .../4-python3-xmltodict_0.11.0-2_all.deb ...
Unpacking python3-xmltodict (0.11.0-2) ...
Selecting previously unselected package python3-winrm.
Preparing to unpack .../5-python3-winrm_0.3.0-2_all.deb ...
Unpacking python3-winrm (0.3.0-2) ...
Setting up python3-kerberos (1.1.14-1build1) ...
Setting up python3-winrm (0.3.0-2) ...
Pasul 3: Actualizați fișierul Ansible Inventory
Acum, voi edita fișierul ansible hosts cu adresa IP a sistemului Windows. Deci, acum ansible va ști ce sistem Windows trebuie să se conecteze.
[email protected]:~$ sudo gedit /etc/ansible/hosts

[win]
192.168.0.102
Pasul 4: Actualizați variabilele grupului Ansible
Creați un director pentru a pune variabilele necesare pentru a vă conecta la sistemul Windows.
[email protected]:~$ mkdir /etc/ansible/group_vars
[email protected]:~$ sudo chmod -R 777 /etc/ansible/
Creați un fișier win.yaml și puneți detaliile utilizatorului pe care le-ați creat în primul pas și mai multe variabile necesare pentru a vă conecta la sistemul Windows.
[email protected]:~$ gedit /etc/ansible/group_vars/win.yaml
---

ansible_user: ansible

ansible_password: ansible

ansible_connection: winrm

ansible_winrm_server_cert_validation: ignore

ansible_winrm_transport: basic

ansible_winrm_port: 5985

ansible_python_interpreter: C:Userstipstrick.roAppDataLocalProgramsPythonPython37python
Pasul 5: Configurați serverele Windows pentru a le gestiona
Deschideți Windows Power Shell și actualizați-l. Trebuie să aveți Powershell 3.0 și .NET Framework 4.0 prezente pe mașina Windows.
PS C:WINDOWSsystem32> $url = "https://raw.githubusercontent.com/jborean93/ansible-windows/master/scripts/Upgrade-PowerShell.ps1"
PS C:WINDOWSsystem32> $file = "$env:tempUpgrade-PowerShell.ps1"
PS C:WINDOWSsystem32> $username = "ansible"
PS C:WINDOWSsystem32> $password = "ansible"
PS C:WINDOWSsystem32> (New-Object -TypeName System.Net.WebClient).DownloadFile($url, $file)
PS C:WINDOWSsystem32> Set-ExecutionPolicy -ExecutionPolicy Unrestricted -Force
PS C:WINDOWSsystem32> &$file -Version 5.1 -Username $username -Password $password -Verbose
Pentru a configura WinRM pe un sistem Windows cu ansible, ansible a furnizat un script de configurare la distanță. Rulați scriptul în PowerShell.
PS C:WINDOWSsystem32> $url = "https://raw.githubusercontent.com/ansible/ansible/devel/examples/scripts/ConfigureRemotingForAnsible.ps1"
PS C:WINDOWSsystem32> $file = "$env:tempConfigureRemotingForAnsible.ps1"
PS C:WINDOWSsystem32> (New-Object -TypeName System.Net.WebClient).DownloadFile($url, $file)
PS C:WINDOWSsystem32> powershell.exe -ExecutionPolicy ByPass -File $file
PS C:WINDOWSsystem32> winrm enumerate winrm/config/Listener

Listener
Address = *
Transport = HTTP
Port = 5985
Hostname
Enabled = true
URLPrefix = wsman

CertificateThumbprint
ListeningOn = 127.0.0.1, 169.254.8.240, 169.254.36.9, 169.254.102.217, 169.254.215.170, 192.168.0.102, ::1, fe80::3131:c6d7:9ef5:8f0%7, fe80::51b7:9134:550d:d7aa%22, fe80::88f1:1229:e1dd:2409%16, fe80::99cf:5796:4f8e:f5c1%15, fe80::fd77:c19d:e0f2:66d9%9

Listener
Address = *
Transport = HTTPS
Port = 5986
Hostname = DESKTOP-2L8QMI6
Enabled = true
URLPrefix = wsman

CertificateThumbprint = C83B3FC8B274D0B650F0FD647DC7AC129BBE3FA0
ListeningOn = 127.0.0.1, 169.254.8.240, 169.254.36.9, 169.254.102.217, 169.254.215.170, 192.168.0.102, ::1, fe80::3131:c6d7:9ef5:8f0%7, fe80::51b7:9134:550d:d7aa%22, fe80::88f1:1229:e1dd:2409%16, fe80::99cf:5796:4f8e:f5c1%15, fe80::fd77:c19d:e0f2:66d9%9
Setați winrm pentru a permite traficul HTTP.
PS C:WINDOWSsystem32> winrm set winrm/config/service '@{AllowUnencrypted="true"}'
Service
RootSDDL = O:NSG:BAD:P(A;;GA;;;BA)(A;;GR;;;IU)S:P(AU;FA;GA;;;WD)(AU;SA;GXGW;;;WD)

MaxConcurrentOperations = 4294967295

MaxConcurrentOperationsPerUser = 1500

EnumerationTimeoutms = 240000
MaxConnections = 300

MaxPacketRetrievalTimeSeconds = 120
AllowUnencrypted = true
Auth
Basic = true
Kerberos = true
Negotiate = true
Certificate = false
CredSSP = false

CbtHardeningLevel = Relaxed
DefaultPorts
HTTP = 5985
HTTPS = 5986
IPv4Filter = *
IPv6Filter = *

EnableCompatibilityHttpListener = false

EnableCompatibilityHttpsListener = false

CertificateThumbprint
AllowRemoteAccess = true
Setați autentificarea la bază în wirm.
PS C:WINDOWSsystem32> winrm set winrm/config/service/auth '@{Basic="true"}'
Auth
Basic = true
Kerberos = true
Negotiate = true
Certificate = false
CredSSP = false
CbtHardeningLevel = Relaxed
Pasul 6: Testați conexiunea la Windows Server
Acum toți pașii de pe mașină sunt gata. Accesați mașina controler ansible și trimiteți ping la mașina server Windows folosind modulul win_ping ansible.
[email protected]:~$ ansible win -m win_ping
192.168.0.102 | SUCCESS => {

"changed": false,
"ping": "pong"
}
Mesajul de succes arată că conexiunea a fost stabilită. Acum, sistemul Windows este gata pentru a fi administrat de la distanță din Ansible care rulează pe Ubuntu.